windows上的eclipse程序打jar包在linux上运行(xml-rpc初试)
日期:2014-05-16 浏览次数:21189 次
windows下的eclipse程序打jar包在linux下运行(xml-rpc初试)
由于项目需要在windows下面写的程序在linux下运行。
测试xml-rpc的运用
XML-RPC只是一个协议,这里主要介绍一个实现了 XML-RPC协议的java 开源的框架apache的 XML-RPC 实现。
第一步:去官方下载XML-RPC框架,地址是:Apache XML-RPC
第二步: XML-RPC分为客户端跟服务端。
创建客户端:
Handler:
创建服务端:
这是一个最简单的hello代码。
下面要去测试远程的调用,然后抓包下来看。
把项目打包放到linux(IP:192.168.19.2)上面运行server端,在windows上面运行client,然后通过tcpdump抓包。
第一:首先把项目打包,在eclipse中在项目名上面右击,选择Export,然后出现
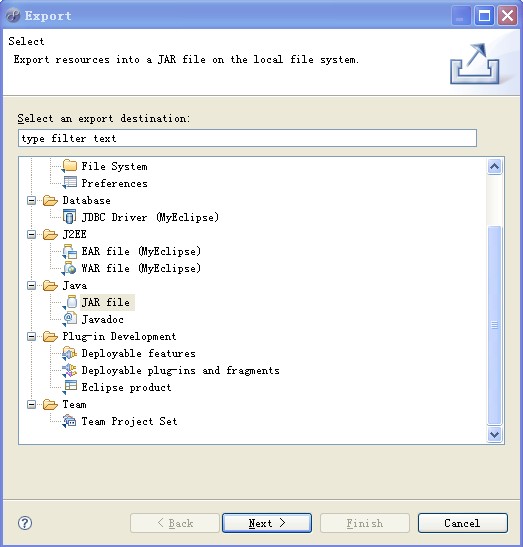
选择jar包,导出。
这个就生成了工程的一个jar包。我的命名为server.jar
,再加上xml-RPC原来的几个包,commons-logging-1.1.jar;ws-commons-util-1.0.2.jar;xmlrpc-client-3.1.2.jar;xmlrpc-common-3.1.2.jar;xmlrpc-server-3.1.2.jar.
在linux的那台机子上的某个目录下建个文件夹,我的是/opt/test,把上个几个.jar包拷贝到test文件夹中。这样后再写一个shell文件来运行server端。
shell的写法。
#! /bin/sh
/opt/jdk/1.6/bin/java -cp "/opt/test/commons-logging-1.1.jar:/opt/test/server.jar:/opt/test/ws-commons-util-1.0.2.jar:/opt/test/xmlrpc-client-3.1.2.jar:/opt/test/xmlrpc-common-3.1.2.jar:/opt/test/xmlrpc-server-3.1.2.jar" org.apache.xmlrpc.test.HelloServer
保存后命名test.sh,chmod 777 test.sh (赋权限)
然后运行./test.sh,这时server端就已经运行起来。
通过tcpdump -i ethx -s 0 host 192.168.19.2 port 7777 -w /tmp/ws.cap进行抓包,保存到/tmp/ws.cap 然后用ethereal工具打开。
由于项目需要在windows下面写的程序在linux下运行。
测试xml-rpc的运用
XML-RPC只是一个协议,这里主要介绍一个实现了 XML-RPC协议的java 开源的框架apache的 XML-RPC 实现。
第一步:去官方下载XML-RPC框架,地址是:Apache XML-RPC
第二步: XML-RPC分为客户端跟服务端。
创建客户端:
import java.net.MalformedURLException;
import java.net.URL;
import org.apache.xmlrpc.XmlRpcException;
import org.apache.xmlrpc.client.XmlRpcClient;
import org.apache.xmlrpc.client.XmlRpcClientConfigImpl;
import org.apache.xmlrpc.client.XmlRpcHttpClientConfig;
import org.apache.xmlrpc.client.XmlRpcLiteHttpTransportFactory;
import org.apache.xmlrpc.client.XmlRpcLocalTransportFactory;
import org.apache.xmlrpc.client.XmlRpcSunHttpTransportFactory;

public class HelloClient {
	public static void main(String[] arg)throws MalformedURLException, XmlRpcException {
		//XmlRpcHttpClientConfig clientConfig =  XmlRpcHttpClientConfig();
		XmlRpcClientConfigImpl clientConfig = new XmlRpcClientConfigImpl();
		clientConfig.setServerURL(new URL("http://192.168.19.2:7777/xmlrpc"));

		XmlRpcClient client = new XmlRpcClient();
		client.setTransportFactory(new XmlRpcSunHttpTransportFactory(client));

		client.setConfig(clientConfig);
		Object[] params = new Object[] { "wly"};
        String result = (String) client.execute("hello.sayHello", params);
        System.out.println("Response from server is: " + result);
	}
}
Handler:
public class HelloHandler {
	public String sayHello(String name){
		return "hello11:"+name;
	}
}
创建服务端:
import java.io.IOException;
import org.apache.xmlrpc.XmlRpcException;
import org.apache.xmlrpc.server.PropertyHandlerMapping;
import org.apache.xmlrpc.server.XmlRpcServer;
import org.apache.xmlrpc.server.XmlRpcServerConfigImpl;
import org.apache.xmlrpc.webserver.WebServer;

	public class HelloServer {
		public static final int PORT = 7777;

		public static void main(String[] arg)throws XmlRpcException,IOException{
			System.out.println("Start rpc Server Now...");
			WebServer webServer = new WebServer(PORT
			XmlRpcServer xmlRpcServer = webServer.getXmlRpcServer();
			PropertyHandlerMapping  propertyHandlerMapping =  new PropertyHandlerMapping();
			propertyHandlerMapping.addHandler("hello", HelloHandler.class);
			xmlRpcServer.setHandlerMapping(propertyHandlerMapping);
			XmlRpcServerConfigImpl serverConfig = (XmlRpcServerConfigImpl)xmlRpcServer.getConfig();
			serverConfig.setEnabledForExceptions(true);
			serverConfig.setContentLengthOptional(false);
			webServer.start();
			System.out.println("Registered HelloHandler to \"hello\"");
			System.out.println("Now Accepting Requests ...");
		}
	}
这是一个最简单的hello代码。
下面要去测试远程的调用,然后抓包下来看。
把项目打包放到linux(IP:192.168.19.2)上面运行server端,在windows上面运行client,然后通过tcpdump抓包。
第一:首先把项目打包,在eclipse中在项目名上面右击,选择Export,然后出现
选择jar包,导出。
这个就生成了工程的一个jar包。我的命名为server.jar
,再加上xml-RPC原来的几个包,commons-logging-1.1.jar;ws-commons-util-1.0.2.jar;xmlrpc-client-3.1.2.jar;xmlrpc-common-3.1.2.jar;xmlrpc-server-3.1.2.jar.
在linux的那台机子上的某个目录下建个文件夹,我的是/opt/test,把上个几个.jar包拷贝到test文件夹中。这样后再写一个shell文件来运行server端。
shell的写法。
#! /bin/sh
/opt/jdk/1.6/bin/java -cp "/opt/test/commons-logging-1.1.jar:/opt/test/server.jar:/opt/test/ws-commons-util-1.0.2.jar:/opt/test/xmlrpc-client-3.1.2.jar:/opt/test/xmlrpc-common-3.1.2.jar:/opt/test/xmlrpc-server-3.1.2.jar" org.apache.xmlrpc.test.HelloServer
保存后命名test.sh,chmod 777 test.sh (赋权限)
然后运行./test.sh,这时server端就已经运行起来。
通过tcpdump -i ethx -s 0 host 192.168.19.2 port 7777 -w /tmp/ws.cap进行抓包,保存到/tmp/ws.cap 然后用ethereal工具打开。
免责声明: 本文仅代表作者个人观点,与爱易网无关。其原创性以及文中陈述文字和内容未经本站证实,对本文以及其中全部或者部分内容、文字的真实性、完整性、及时性本站不作任何保证或承诺,请读者仅作参考,并请自行核实相关内容。