Apache Pivot初体验(2)
日期:2014-05-16 浏览次数:21693 次
Apache Pivot初体验(二)
上一篇我们探究了如何构建Pivot开发框架,编写Pivot桌面应用程序。这一篇我们来说说如何在web环境中部署Pivot程序。webapp发布目录 如下所示:
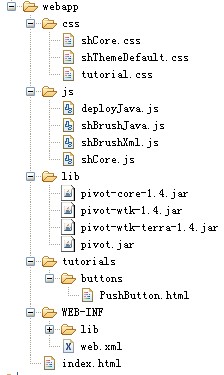
css中的样式表和js下的JavaScript脚本都是根据官方示例中拷贝下来的,其中最重要的是deployJava.js,它是展示Java applet的工具包,Pivot在页面中就是以Applet的形式展现的,js文件在http://java.com/js/deployJava.js 下载。Lib下是Pivot应用所依赖的类库,可以看出pivot.jar是我自定义的jar,就是编好代码打的包,而WEB-INF/lib下的库和Pivot没有关系,那里的库正常是访问不到的。
下面展示HTML页面
关键是JS段代码,其实都是固定套路,只需修改自定义的jar即可,其他段根据字母意思即可理解,关键是lib库的位置一定要对。下面说说ANT打包。
上一篇我们探究了如何构建Pivot开发框架,编写Pivot桌面应用程序。这一篇我们来说说如何在web环境中部署Pivot程序。webapp发布目录 如下所示:
css中的样式表和js下的JavaScript脚本都是根据官方示例中拷贝下来的,其中最重要的是deployJava.js,它是展示Java applet的工具包,Pivot在页面中就是以Applet的形式展现的,js文件在http://java.com/js/deployJava.js 下载。Lib下是Pivot应用所依赖的类库,可以看出pivot.jar是我自定义的jar,就是编好代码打的包,而WEB-INF/lib下的库和Pivot没有关系,那里的库正常是访问不到的。
下面展示HTML页面
<!DOCTYPE html PUBLIC "-//W3C//DTD XHTML 1.0 Transitional//EN" "http://www.w3.org/TR/xhtml1/DTD/xhtml1-transitional.dtd">
<html xmlns="http://www.w3.org/1999/xhtml">
<head>
<meta content="text/html; charset=UTF-8" http-equiv="Content-Type" />
<title>Push Buttons</title>
<script src="/pivot/js/deployJava.js" type="text/javascript"></script>
</head>
<body>
<script xmlns="" type="text/javascript">
            var attributes = {
code:'org.apache.pivot.wtk.BrowserApplicationContext$HostApplet',
                width:'480',
                height:'360'
            };
            var libraries = [];
            libraries.push("/pivot/lib/pivot-core-1.4.jar");
            libraries.push("/pivot/lib/pivot-wtk-1.4.jar");
            libraries.push("/pivot/lib/pivot-wtk-terra-1.4.jar");
            libraries.push("/pivot/lib/pivot.jar");
            attributes.archive = libraries.join(",");
            var parameters = {
                codebase_lookup:false,
                java_arguments:'-Dsun.awt.noerasebackground=true -Dsun.awt.erasebackgroundonresize=true',
     application_class_name:'pivot.tutorials.buttons.PushButtons'
            };
            deployJava.runApplet(attributes, parameters, "1.6");
</script>
</body>
</html>
关键是JS段代码,其实都是固定套路,只需修改自定义的jar即可,其他段根据字母意思即可理解,关键是lib库的位置一定要对。下面说说ANT打包。
<?xml version="1.0" encoding="UTF-8" ?>
<project name="pivot" default="all">
	<description>The Pivot Application</description>
	<!-- 定义文件夹 -->
	<property name="srcDir" location="." />
	<property name="classDir" location="../webapp/WEB-INF/classes" />
	<property name="libDir" location="../webapp/WEB-INF/lib" />
         <property name="webDir" location="../webapp" />
	<!--用于输出打包的文件夹-->
	<property name="tempDir" location="${java.io.tmpdir}/${ant.project.name}" />
	<property name="targetDir" location="../target" />
	<!-- 定义classpath -->
	<path id="master-classpath">
		<fileset file="${libDir}/*.jar" />
		<pathelement path="${classDir}" />
	</path>
	<!-- 执行清理 -->
	<target name="clean">
		<delete dir="${classDir}" />
		<delete dir="${tempDir}" />
		<delete file="${targetDir}/${ant.project.name}.jar" />
		<delete file="${targetDir}/${ant.project.name}.war" />
		<delete dir="${targetDir}" />
	</target>
	<!-- 初始化任务 -->
	<target name="init" depends="clean">
		<mkdir dir="${targetDir}" />
		<mkdir dir="${tempDir}" />
		<mkdir dir="${classDir}" />
	</target>
	<!-- 编译 -->
	<target name="compile" depends="init" description="compile the source files">
		<javac srcdir="${srcDir}" destdir="${classDir}" debug="true" encoding="UTF-8">
			<classpath refid="master-classpath" />
		</javac>
		<copy todir="${classDir}" overwrite="true">
			<fileset dir="${srcDir}">
				<include name="**/*.xml" />
				<include name="**/*.properties" />
			</fileset>
		</copy>
	</target>
	<!--打jar包-->
	<target name="jar" depends="compile">
		<jar jarfile="${targetDir}/${ant.project.name}.jar">
			<fileset dir="${classDir}">
				<include name="**/*" />
			</fileset>
		</jar>
	</target>
	<!—准备war包 -->

	<target
免责声明: 本文仅代表作者个人观点,与爱易网无关。其原创性以及文中陈述文字和内容未经本站证实,对本文以及其中全部或者部分内容、文字的真实性、完整性、及时性本站不作任何保证或承诺,请读者仅作参考,并请自行核实相关内容。